Paint Tutorial.
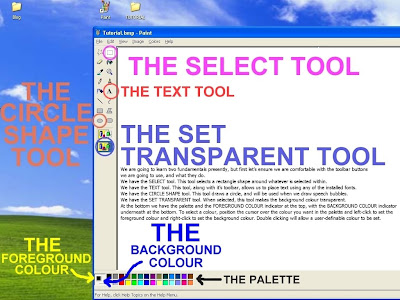
We are going to learn two fundamentals presently, but first let's ensure we are comfortable with the toolbar buttons we are going to use, and what they do. We have the SELECT tool. This tool selects a rectangle shape around whatever is selected within.We have the TEXT tool. This tool, along with it's toolbar, allows us to place text using any of the installed fonts.We have the CIRCLE SHAPE tool. This tool draws a circle, and will be used when we draw speech bubbles.We have the SET TRANSPARENT tool. When selected, this tool makes the background colour transparent. At the bottom we have the palette and the FOREGROUND COLOUR indicator at the top, with the BACKGROUND COLOUR indicator underneath at the bottom. To select a colour, position the cursor over the colour you want in the palette and left-click to set the foreground colour and right-click to set the background colour. Double clicking will allow a user-definable colour to be set. Clicking on the graphics below will enable a larger view.
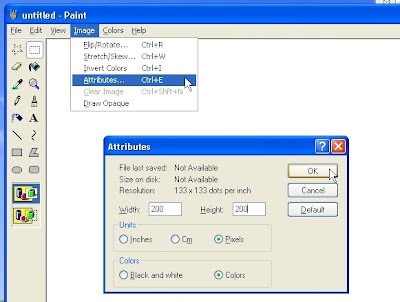
 Let's open Paint. Ensure you have sufficient white workspace. If necessary, you can click on Image, attributes drop down menu.This will open a dialog box where you can set the Width to 800 and Height to 600, selecting Pixels and Colors. Click OK.
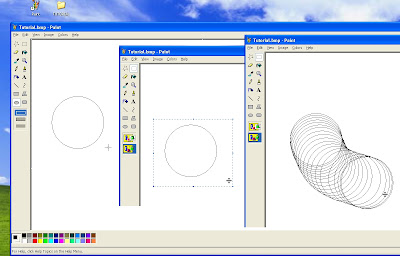
Select a black foreground and a white background if not already selected by default. Select the circle shape tool. When this is selected, another box will open below allowing selection of a circle using the foreground colour alone, the foreground colour filled with the background colour, or the background colour alone. Select the top one, the foreground colour alone. Place your mouse cursor into the white workspace and press and hold a keyboard shift key, press & hold left-click and drag the mouse to produce a circle. The shift key will constrain the drawing to a perfect circle. Leave the foreground and background unchanged, and select the select tool and the lower set transparent tool. Drag a select box around your circle.
Press and hold a keyboard shift key, and drag your selected circle around at a reasonable speed. You will see that this leaves a trail of circles behind. We will use this technique later to produce LOLCAT text.
 You can use the Edit, Undo drop down menu to undo a few steps if necessary, or Image, Clear Image to clear the workspace. Let's do some text. Select the text tool and drag a text box on the white workspace. If the text toolbar doesn't appear, select the View drop down menu and select Text Toolbar. Select Aerial as the font at a size of 48, bold, ensuring your text box is big enough for the text. Ensure the foreground colour is black, and the background white and type a word, I have used BLOG. Click outwith the text box on the workspace to clear the text box and toolbar.
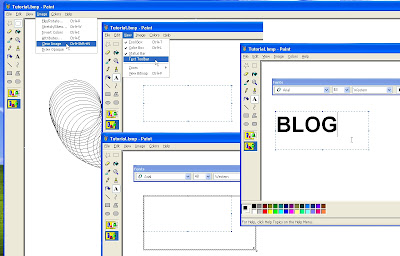 Select a blue foreground & background, and select the rectangle shape tool with the middle fill selection. Leaving your text untouched, drag a nice big blue shape on the left hand side of your white workspace. We will call this the blue workspace. Select a black foreground & white background. Select the select tool and the lower set transparent tool. Drag a select box around your text. Press and hold a keyboard Ctrl (Control) key. Drag the selected box around your text over to the blue workspace. The control key allows us to make a copy of the selection. You will see that the white background has become transparent and the blue background is now behind the text. If we select the text again on the blue background and paste this into another instance of Paint with blue selected as the background, it will paste in as transparent. It isn't necessary to use the blue background, nor another instance of Paint, but this is the technique I find easiest, and allows a degree of flexibility in that the blue workspace serves as the layers or selections and the graphic instance serves as the final merge.
Let's put some text onto the makeawish.jpg graphic. The graphic is below:
Click on the graphic to get the full size version which is 400x327 pixels. Right click and copy the image to to your clipboard. Open another instance of Paint, and select the Image, Attributes drop down menu. Change the Width & Height settings to 200x200. Click OK. Select Edit, Paste drop down menu. A dialog box should open telling you that the pasted image is bigger than the workspace, and would you like the workspace enlarged? Choose Yes.
 All that above is to allow us to paste the makeawish.jpg graphic on its own, and not into a bigger workspace.We now have two instances of Paint, one with our blue workspace and source text, and one with the target makeawish graphic.
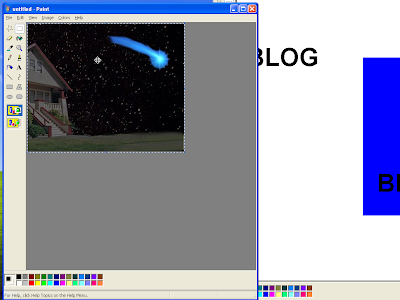 Move the focus to our blue workspace instance of Paint. Select the select tool and the lower set transparent tool. Drag a select box around the text on the blue background. Select Image, Invert Colors from the drop down menu. Your black text on a blue background will now have changed to white text on a yellow background, and as long as you have not clicked outwith the selected box, it will still be selected. We are inverting the colours to get the text white, since we will be pasting it into a dark background. We could easily use the fill tool and make the text any colour we choose.
Copy this box by either right clicking within the box & select Copy, or use the Edit, Copy drop down menu.
Move the focus to the makeawish instance of Paint. The select tool should still be selected and the lower set transparent tool. If not, select the select tool and the lower set transparent tool. Select yellow as the foreground & background colour. Select Edit, Paste from the drop down menu.
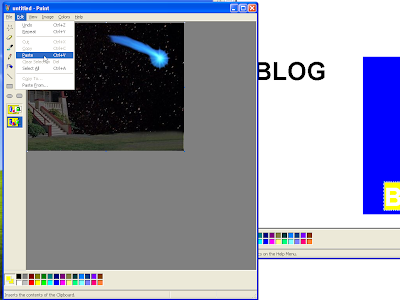 Your selected text will now appear as white with the yellow background replaced by a transparent background, within a select box that allows you to position the text.
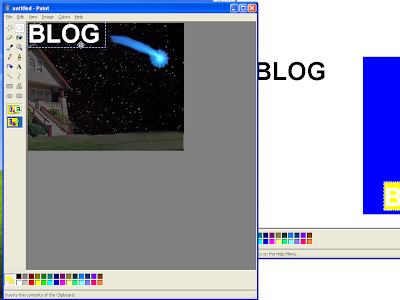 When you have positioned the text and click outwith the box to drop the text, it is no longer selectable and is merged into the graphic.Text of any colour can be pasted as long as it's background colour is the same as that set when it's pasted (with the lower set transparent tool also set). If the text is pasted in twice with different colours, some nice shadow or highlight effects can be made. When you have finished pasting text onto your graphic, use file, save as, and call your file a unique name.jpg, so that you do not overwrite any original you may have.
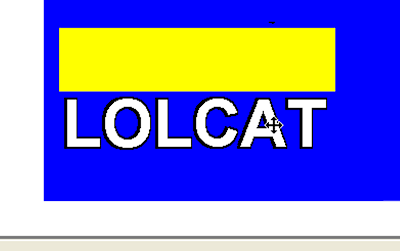
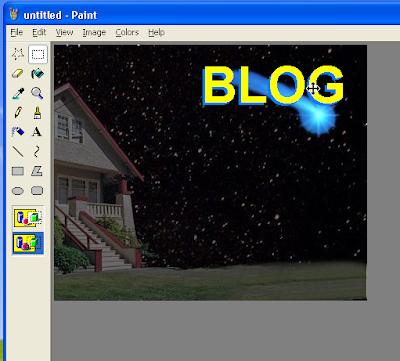 Move the focus back to our blue workspace instance of Paint. If necessary, you can clear the workspace and redraw the filled blue rectangle workspace. Select a black foreground & white background colour. Select the text tool and drag a text box. Leave the type as Aerial 48 bold. Type LOLCAT into your text box. Click outwith the text box on the workspace to de-select it. Select the select tool and the lower set transparent tool. Drag a select box around the LOLCAT text. Press and hold a keyboard Control key. Drag a copy of the text to the blue background. Continue to hold the keyboard Conrol key down, release the left mouse button, then click the left mouse button again and drag another copy of the text to another place on the blue workspace. Release the keyboard Control key. Do not de-select yet. Do you remember the circle we drew and trailed with the shift key? We are going to use that technique again now.
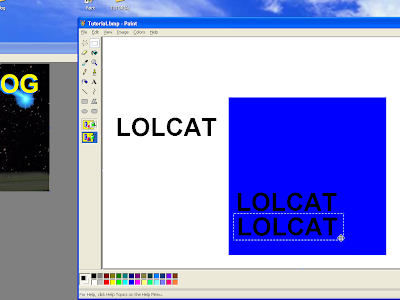 Press and hold the shift key. Drag the selected box down 5 or 6 pixels, then left 5 or 6 pixels, then up 5 or 6 pixels.The black text will leave a trail overwriting itself and become thick enough to act as a black border. When you are happy with your trailed text, de-select the box. The cursor on the examples below jumps about because I had to stop and save the graphic.
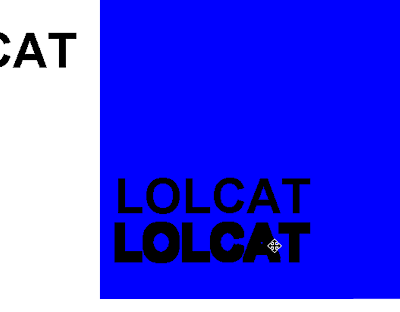 Select a yellow foreground & yellow Background. Select the select tool if not already selected, and drag a select box around the first copy of LOLCAT text on the blue workspace. Select Image, Invert Colors from the drop down menu, and the selected text will change from black on blue to white on yellow. We are inverting the colours simply to give us white text. We could use the fill tool to give us any colour we choose.
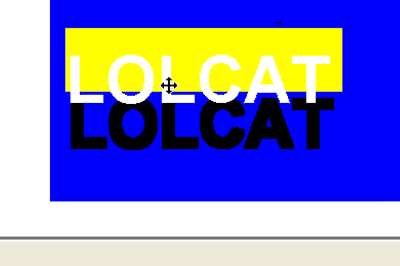
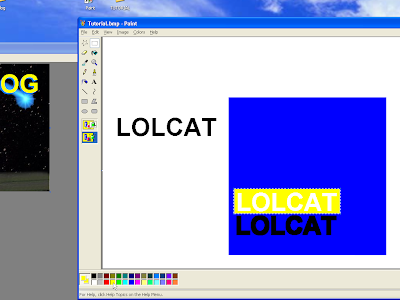 Position the cursor inside the selected box and drag the white text over to your trailed black LOLCAT text. Position the white text into the centre of the trailed text and de-select. You should now have white text with a reasonable black border, on a blue background. You can copy this text and drop it into any graphic using the technique learned above.
 Clear the workspace and redraw the blue workspace. Select a black foreground & white background. Select any of the line tools. This will open up a line thickness selection tool just below. Select the middle thickness tool. Select the circle shape tool. Select the middle fill selection. Position the cursor on the blue workspace and drag an ellipse to be a speech bubble. The elipse will have a black outer line of the thickness selected above, and a white filled centre.
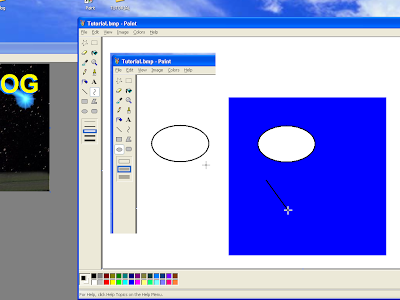 Select the curve line tool. Leave the middle thickness line selected. Position the cursor over the blue workspace and drag a small line down to what we will call the second insertion point. Move the cursor to the middle of this line and drag the line left or right into a curve. When you are satisfied with the curve, release the left mouse button. Position the cursor over the second insertion point and click the left mouse button to finish the curve. Draw a second curve line downwards to the second insertion point to finish the pointer of the speech bubble. Of course you can just use straight lines for the pointer. But that would be too easy.
 Select the paintbrush tool. Select the largest square paintbrush from the lower selection. We are going to paint the top of our newly drawn speech bubble pointer white, so that when we move it to the speech bubble, the white fill of the speech bubble will be unbroken. You can use the Magnifier tool to assist with this. Select the Magnifier tool and a moveable box will appear. Position this box over the top of the speech bubble pointer and left click. you will now have a magnifed view. Select the paintbrush tool again and position the square cursor on the blue between the top of the black curves and right click to draw a white line between them.To get back to a normal view, select View, Zoom, Normal Size from the drop down menu.
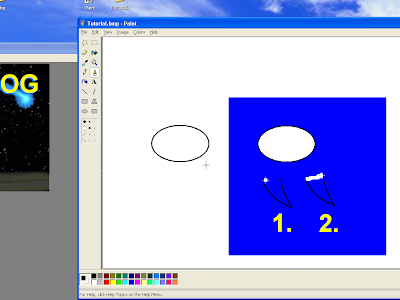 Select a blue foreground & blue background. Select the select tool and the lower set transparent tool. Drag a select box around your speech bubble pointer and drag the pointer to the speech bubble so that the white fill is unbroken, then de-select.
Finally, I include a graphic for you to practice on. I hope you find this tutorial useful, even if not particularly clear.
 Let's open Paint. Ensure you have sufficient white workspace. If necessary, you can click on Image, attributes drop down menu.This will open a dialog box where you can set the Width to 800 and Height to 600, selecting Pixels and Colors. Click OK.
Select a black foreground and a white background if not already selected by default. Select the circle shape tool. When this is selected, another box will open below allowing selection of a circle using the foreground colour alone, the foreground colour filled with the background colour, or the background colour alone. Select the top one, the foreground colour alone. Place your mouse cursor into the white workspace and press and hold a keyboard shift key, press & hold left-click and drag the mouse to produce a circle. The shift key will constrain the drawing to a perfect circle. Leave the foreground and background unchanged, and select the select tool and the lower set transparent tool. Drag a select box around your circle.
Press and hold a keyboard shift key, and drag your selected circle around at a reasonable speed. You will see that this leaves a trail of circles behind. We will use this technique later to produce LOLCAT text.
 You can use the Edit, Undo drop down menu to undo a few steps if necessary, or Image, Clear Image to clear the workspace. Let's do some text. Select the text tool and drag a text box on the white workspace. If the text toolbar doesn't appear, select the View drop down menu and select Text Toolbar. Select Aerial as the font at a size of 48, bold, ensuring your text box is big enough for the text. Ensure the foreground colour is black, and the background white and type a word, I have used BLOG. Click outwith the text box on the workspace to clear the text box and toolbar.
 Select a blue foreground & background, and select the rectangle shape tool with the middle fill selection. Leaving your text untouched, drag a nice big blue shape on the left hand side of your white workspace. We will call this the blue workspace. Select a black foreground & white background. Select the select tool and the lower set transparent tool. Drag a select box around your text. Press and hold a keyboard Ctrl (Control) key. Drag the selected box around your text over to the blue workspace. The control key allows us to make a copy of the selection. You will see that the white background has become transparent and the blue background is now behind the text. If we select the text again on the blue background and paste this into another instance of Paint with blue selected as the background, it will paste in as transparent. It isn't necessary to use the blue background, nor another instance of Paint, but this is the technique I find easiest, and allows a degree of flexibility in that the blue workspace serves as the layers or selections and the graphic instance serves as the final merge.
Let's put some text onto the makeawish.jpg graphic. The graphic is below:
Click on the graphic to get the full size version which is 400x327 pixels. Right click and copy the image to to your clipboard. Open another instance of Paint, and select the Image, Attributes drop down menu. Change the Width & Height settings to 200x200. Click OK. Select Edit, Paste drop down menu. A dialog box should open telling you that the pasted image is bigger than the workspace, and would you like the workspace enlarged? Choose Yes.
 All that above is to allow us to paste the makeawish.jpg graphic on its own, and not into a bigger workspace.We now have two instances of Paint, one with our blue workspace and source text, and one with the target makeawish graphic.
 Move the focus to our blue workspace instance of Paint. Select the select tool and the lower set transparent tool. Drag a select box around the text on the blue background. Select Image, Invert Colors from the drop down menu. Your black text on a blue background will now have changed to white text on a yellow background, and as long as you have not clicked outwith the selected box, it will still be selected. We are inverting the colours to get the text white, since we will be pasting it into a dark background. We could easily use the fill tool and make the text any colour we choose.
Copy this box by either right clicking within the box & select Copy, or use the Edit, Copy drop down menu.
Move the focus to the makeawish instance of Paint. The select tool should still be selected and the lower set transparent tool. If not, select the select tool and the lower set transparent tool. Select yellow as the foreground & background colour. Select Edit, Paste from the drop down menu.
 Your selected text will now appear as white with the yellow background replaced by a transparent background, within a select box that allows you to position the text.
 When you have positioned the text and click outwith the box to drop the text, it is no longer selectable and is merged into the graphic.Text of any colour can be pasted as long as it's background colour is the same as that set when it's pasted (with the lower set transparent tool also set). If the text is pasted in twice with different colours, some nice shadow or highlight effects can be made. When you have finished pasting text onto your graphic, use file, save as, and call your file a unique name.jpg, so that you do not overwrite any original you may have.
 Move the focus back to our blue workspace instance of Paint. If necessary, you can clear the workspace and redraw the filled blue rectangle workspace. Select a black foreground & white background colour. Select the text tool and drag a text box. Leave the type as Aerial 48 bold. Type LOLCAT into your text box. Click outwith the text box on the workspace to de-select it. Select the select tool and the lower set transparent tool. Drag a select box around the LOLCAT text. Press and hold a keyboard Control key. Drag a copy of the text to the blue background. Continue to hold the keyboard Conrol key down, release the left mouse button, then click the left mouse button again and drag another copy of the text to another place on the blue workspace. Release the keyboard Control key. Do not de-select yet. Do you remember the circle we drew and trailed with the shift key? We are going to use that technique again now.
 Press and hold the shift key. Drag the selected box down 5 or 6 pixels, then left 5 or 6 pixels, then up 5 or 6 pixels.The black text will leave a trail overwriting itself and become thick enough to act as a black border. When you are happy with your trailed text, de-select the box. The cursor on the examples below jumps about because I had to stop and save the graphic.
 Select a yellow foreground & yellow Background. Select the select tool if not already selected, and drag a select box around the first copy of LOLCAT text on the blue workspace. Select Image, Invert Colors from the drop down menu, and the selected text will change from black on blue to white on yellow. We are inverting the colours simply to give us white text. We could use the fill tool to give us any colour we choose.
 Position the cursor inside the selected box and drag the white text over to your trailed black LOLCAT text. Position the white text into the centre of the trailed text and de-select. You should now have white text with a reasonable black border, on a blue background. You can copy this text and drop it into any graphic using the technique learned above.
 Clear the workspace and redraw the blue workspace. Select a black foreground & white background. Select any of the line tools. This will open up a line thickness selection tool just below. Select the middle thickness tool. Select the circle shape tool. Select the middle fill selection. Position the cursor on the blue workspace and drag an ellipse to be a speech bubble. The elipse will have a black outer line of the thickness selected above, and a white filled centre.
 Select the curve line tool. Leave the middle thickness line selected. Position the cursor over the blue workspace and drag a small line down to what we will call the second insertion point. Move the cursor to the middle of this line and drag the line left or right into a curve. When you are satisfied with the curve, release the left mouse button. Position the cursor over the second insertion point and click the left mouse button to finish the curve. Draw a second curve line downwards to the second insertion point to finish the pointer of the speech bubble. Of course you can just use straight lines for the pointer. But that would be too easy.
 Select the paintbrush tool. Select the largest square paintbrush from the lower selection. We are going to paint the top of our newly drawn speech bubble pointer white, so that when we move it to the speech bubble, the white fill of the speech bubble will be unbroken. You can use the Magnifier tool to assist with this. Select the Magnifier tool and a moveable box will appear. Position this box over the top of the speech bubble pointer and left click. you will now have a magnifed view. Select the paintbrush tool again and position the square cursor on the blue between the top of the black curves and right click to draw a white line between them.To get back to a normal view, select View, Zoom, Normal Size from the drop down menu.
 Select a blue foreground & blue background. Select the select tool and the lower set transparent tool. Drag a select box around your speech bubble pointer and drag the pointer to the speech bubble so that the white fill is unbroken, then de-select.


5 Comments:
I canz fly! Cover me, I iz going in!
OMG a tutorial and I am a dork at all of this, amazing Sans. Forgive my absence, I'm a slow learner but I'm bookmarking this for sure. Meanwhile, inbetween times, I'm trying to lay a brick patio... which is alot easier than this.
Thanks mucho !
Identity, the journey is the reward. The caption is great! I shall post it.
Marjorie, you are always welcome. I look forward to pictures of the patio!
Bless you, Sans.
Julia, I hope it's useful. I will do my best to answer questions.
Post a Comment
<< Home